Building asynchronous, non blocking and scalable applications with Celery and Redis: A case study
Modern web applications routinely serve thousands of concurrent users. A single architectural decision can make the difference between humming along under load and grinding to a halt: how the system deals with slow, long-running work. In a blocking architecture, a server worker only handles one request at a time. This means that any operation that takes a while — encoding a video, generating a report, sending a batch of emails — makes every other user behind it wait. This is turned on its head by a non-blocking architecture: heavy work is delegated to background workers and the main process is freed almost instantly to keep serving incoming requests. That difference sounds academic until you see it in practice.
A simplified example
Imagine this: someone on YouTube is excited to watch the music video for their favorite band’s new song after a fifteen-year break. Just ten seconds in, someone else on the other side of the world starts uploading their nine-hour, no-death Dark Souls 3 speedrun. As soon as the upload begins, the whole platform freezes for everyone. Videos stop playing, comments won’t post, search doesn’t work, and recommendations won’t load. The first user, stuck in the first seconds of the song, just sees a buffering icon—and keeps waiting, because nothing will work until all nine hours of footage of the other user’s upload finish uploading. This is a prime example of an application that does not follow a non-blocking architecture to ensure that smooth user-UI interactions that are not affected by the load of backend processes running on the server side of the application.
In modern applications, one can take this challenge one step further and ask the following question.
“My application not only needs to serve users without blocking or freezing when a background process is running, but is also needs to robustly accommodate a large number of such processes as efficiently as possible, while the end users can freely navigate the UI wihout any obstructions.”
Therefore, the task is now updated to not only ensuring the non-blocking behaviour of our app, but also how do we accommodate a large number of such non-blocking processes in a manageable way.
Typically, an application based on a non-blocking architecture operates in the following manner:
- A user will initiate a long running process via the UI.
- The server does 2 things:
- Registers the process to a broker who will in turn hand the job of executing this process to one of many available workers.
- Lets the user know that their request was received and handed over to a worker for execution (instant acknowledgment).
- The user proceeds to do something else, while being able to go back and check on the progress of the process they submitted earlier.
But what exactly is a broker and a worker? A worker is a separate process whose entire job is to execute long-running tasks. A message broker is a system that is able to take in the requests coming from the server and distribute them to different workers for execution. The message broker is used to implement a task queue which is simply the component which is in charge of temporarily registering processes to be executed until workers can pick them up for execution.
This is precisely where Celery and Redis enter the story. Celery, is a distributed task queue library for Python and Redis is a popular broker choice. Specifically, Celery provides the worker processes and the machinery for defining, dispatching, and executing background jobs. Redis, in this setup, plays the important role of the message broker: an in-memory data store fast enough to act as the inbox where Celery tasks are queued, claimed, and tracked. When the example Youtube server receives the nine-hour upload from above, it doesn’t process the video itself, it creates a Celery task, Redis adds it into the queue, and immediately returns a response to the uploader. A Celery worker running in its own process (and optionally on its own machine) and sees the new task in Redis, picks it up, and begins the long work of saving and encoding the file. Meanwhile, the web server is free, the music video keeps playing, and our first user never knows any of this happened.

The diagram above provides a simple representation of the non-blocking workflow achieved with Celery. The duplication of the User/UI and Web server entities is not literal, it signifies their state at two different times. The top row at time when the user asks for a task to be executed and the bottom row when the user asks for information about the completion status of the task, with the option of retrieving the result if the task has finished.
Implementing the workflow with Celery
Now that we’ve outlined the architecture, let’s see what it actually looks like in code. A Celery setup has three moving parts that we need to wire together: the Celery application (which has information about the broker and the registered tasks), the task definitions (these are the Python functions that the workers will execute), and the client-side component (the web server code that hands work off to the queue). We’ll build each one in turn, using the long video upload from our example as the task to be processed.
-
The Celery application
The Celery app is the central object that ties everything together. It tells Celery which broker we want to use and where it lives, where to store results, and which functions are available as background tasks. In a typical project, it sits in its own module (something like tasks.py) so that both the web server and the worker process can import it.
# tasks.py from celery import Celery celery_app = Celery( <APP_NAME>, broker="redis://localhost:6379/0", backend="redis://localhost:6379/1", )- redis://localhost:6379/0 is where the broker lives, it will be used to add tasks to the queue.
- redis://localhost:6379/1 is the backend, which is where workers will write the outcome of a finished task so the web server can later retrieve it.
-
Defining a task
A task is just a Python function. It is exactly the process that a worker is supposed to execute in the background. It could be any kind of algorithm - in our Youtube case, this could be the actual processing and upload of a video to a database - and it is decorated with @celery_app.task. The decorator registers the function with the Celery app, which means workers can look at this module and know what operations they have to run if they receive this task from the broker.
# tasks.py (continued)
import time

@celery_app.task
def process_video_upload(video_id: str, file_path: str) -> dict:
   """Encode an uploaded video and generate thumbnails."""
   # In a real system: read the file, transcode to multiple
   # resolutions, generate thumbnails, write to object storage…
   time.sleep(60)  # stand-in for the actual heavy work
   return {
      "video_id": video_id,
      "status": "ready",
      "duration_seconds": 32400,
   }
As you can see, this is an ordindary Python function. The key to this is the Celery decorator which will let us call this function with an additional .delay() call which will tell Celery to send the call to the queue instead of executing it locally.
-
Dispatch task from the web server
Now, we want to build the bridge between the user and Celery. In our server, we define a relevant endpoint which when requested, will initialise the task to be executed.
# views.py (Flask-style for brevity; the same pattern works in Django, FastAPI, etc.)
from flask import Flask, request, jsonify
from tasks import process_video_upload

app = Flask(__name__)

@app.post("/upload_video")
def upload_video():
   video_id = save_uploaded_file(request.files["video"])
   task = process_video_upload.delay(video_id, f"/uploads/{video_id}.mp4")
   return jsonify({"task_id": task.id, "video_id": video_id}), 202
.delay() does the following under the hood: (a) it serializes the function name and arguments, (b) pushes the resulting message onto the broker, and (c) returns an AsyncResult object almost instantly. From that object we can grab task.id (a UUID generated by Celery) and hand it back to the client with HTTP 202 (“Accepted”), which is the standard response code for the server saying to the client that “I’ve received your request and started working on it, but I’m not done yet”.
The web server is now free. It has spent milliseconds on this request, regardless of whether the upload was a three-minute music video or a nine-hour speedrun.
-
Running the worker
In order for jobs to be picked up and be processed, we need active workers that will watch the queue and pick up these jobs.
Setting up running workers is a separate task, through the command line
celery -A tasks worker --loglevel=infoThe key point for this is that this command doesn’t have to run on the same machine as the web server. As long a worker can reach the same Redis instance that the server registers queued tasks to, it can pick up tasks. From here on, scaling up to handle more concurrent task executions is siimply a matter of starting more workers, anywhere.
-
Polling for updates
Recall that Celery instantly provides a task_id to the client side to signify that the task has been received and added to the queue for execution. This task comes in handy for checking on the task’s status in subsequent times. When asking Celery for updates on a submitted job, we can know if the task is pending, running,completed or failed (these are the possible return values most of the time).
Imagine that buffering icon on many UIs that shows up when something is yet to finish. That buffering icon shows up while the answer of the server when polling for the status of a job is either pending or running. As soon as a polling request returns a completed status, we can retrieve the result and stop showing the buffering icon to the user.
Implementation-wise, we expose a small status endpoint that looks up the task’s state:
# views.py (continued)
from celery.result import AsyncResult
from tasks import celery_app

@app.get("/tasks/<task_id>")
def task_status(task_id: str):
   result = AsyncResult(task_id, app=celery_app)
   response = {"task_id": task_id, "state": result.state}
   if result.ready():
      response["result"] = result.result if result.successful() else str(result.result)
   return jsonify(response)
AsyncResult consults the result backend (the /1 Redis database we configured earlier) and reports the task’s current state — PENDING, STARTED, SUCCESS, FAILURE, or RETRY. The browser can poll this endpoint every few seconds and update the UI accordingly: a buffering spinner as we mentioned above while the task is in progress, a success banner once result.ready() returns true.
This is exactly the polling loop drawn in the bottom row of the diagram above, made concrete.
Routing tasks to the right workers
The setup we’ve built so far has a hidden assumption: every worker is equally capable of running every task. In practice, that assumption falls apart fast. Consider our two example tasks side by side: encoding a nine-hour speedrun is CPU-bound and memory-hungry — it might take an hour on a beefy machine and bring a smaller one to its knees. Regenerating a video’s thumbnail, by contrast, takes a couple of seconds and barely registers on the CPU. If both tasks go into the same queue and are picked up by the same pool of workers, two bad things happen.
First, the cheap tasks get stuck behind the expensive ones. A user who just edited their video title and triggered a thumbnail refresh waits behind a speedrun encode that landed in the queue thirty seconds earlier. Second, you’re forced into an awkward sizing decision: either you provision every worker to handle the worst-case task — paying for high-memory machines that spend most of their time regenerating thumbnails — or you provision for the average and watch the expensive tasks crash workers that can’t handle them.
The fix is to give tasks and workers matching labels, so that expensive tasks only land on workers equipped to run them. In Celery, those labels are called queues. We declare which queue a task belongs to, and we start each worker with the list of queues it’s allowed to consume from.
In our python code, tasks can be set up as follows:
# tasks.py
from celery import Celery

celery_app = Celery(
    "youtube_clone",
    broker="redis://localhost:6379/0",
    backend="redis://localhost:6379/1",
)

celery_app.conf.task_routes = {
    "tasks.process_video_upload":  {"queue": "heavy"},
    "tasks.regenerate_thumbnail":  {"queue": "light"},
}

@celery_app.task
def process_video_upload(video_id: str, file_path: str) -> dict:
    ...  # CPU-heavy: transcode, multiple resolutions, write to storage

@celery_app.task
def regenerate_thumbnail(video_id: str) -> dict:
    ...  # cheap: pull one frame, resize, upload
And our workers setup will be:
# On a high-CPU, high-memory machine — handles encodings only
celery -A tasks heavy_worker --loglevel=info -Q heavy --concurrency=2

# On smaller, cheaper machines — handles thumbnails only
celery -A tasks light_worker --loglevel=info -Q light --concurrency=8
In the above example, we implement and register two Celery tasks called process_video_upload and regenerate_thumbnail. The first one is a hypothetically computationally expensive method that would normally need to be executed within a server/machine that has increased computatinal resources (availability og multi-core CPUs and GPUs). Using the python
celery_app.conf.task_routes utility, we let the Celery app know that whenever a process_video_upload job is requested, we will only let the heavy_worker to pick it up and execute it. In a similar manner, we assign any regenerate_thumbnail to the ligh queue, making it available only to light_worker.
There’s one more useful trick worth knowing. A worker can subscribe to multiple queues, which lets you create overflow capacity:
celery -A tasks flexible_worker -Q heavy,light --concurrency=2
This worker prefers heavy tasks (listed first) but will pick up light tasks if the heavy queue is empty. This comes in handy for fallback behavior, but we must use it carefully. The moment that worker grabs a longer light task, it’s no longer available to process a heavy task it was meant to serve. Typically, we’d want strict separation rather than flexible overflow.
Easy, built-in way to monitor Celery apps
The setup we’ve built now has tasks flowing through multiple queues, workers of different shapes consuming them, and results landing in Redis. But in terms of monitoring internal state of our Celery app, we can’t really see much. If a user complains that their task has been “processing” for an hour, where do we look? Is the task still in the queue? Did a worker pick it up and crash? Is it actually running and just slow?
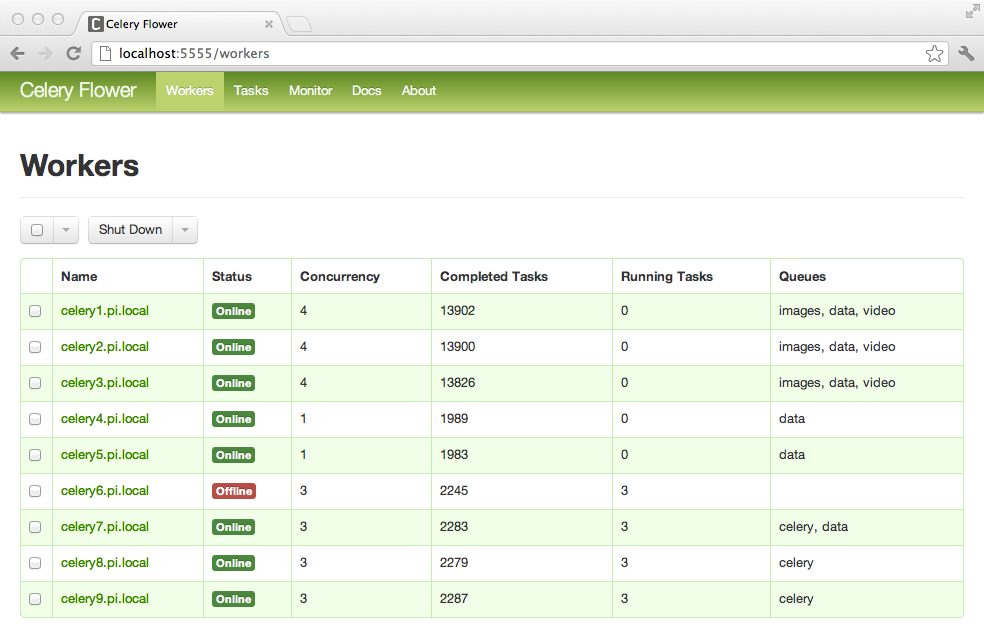
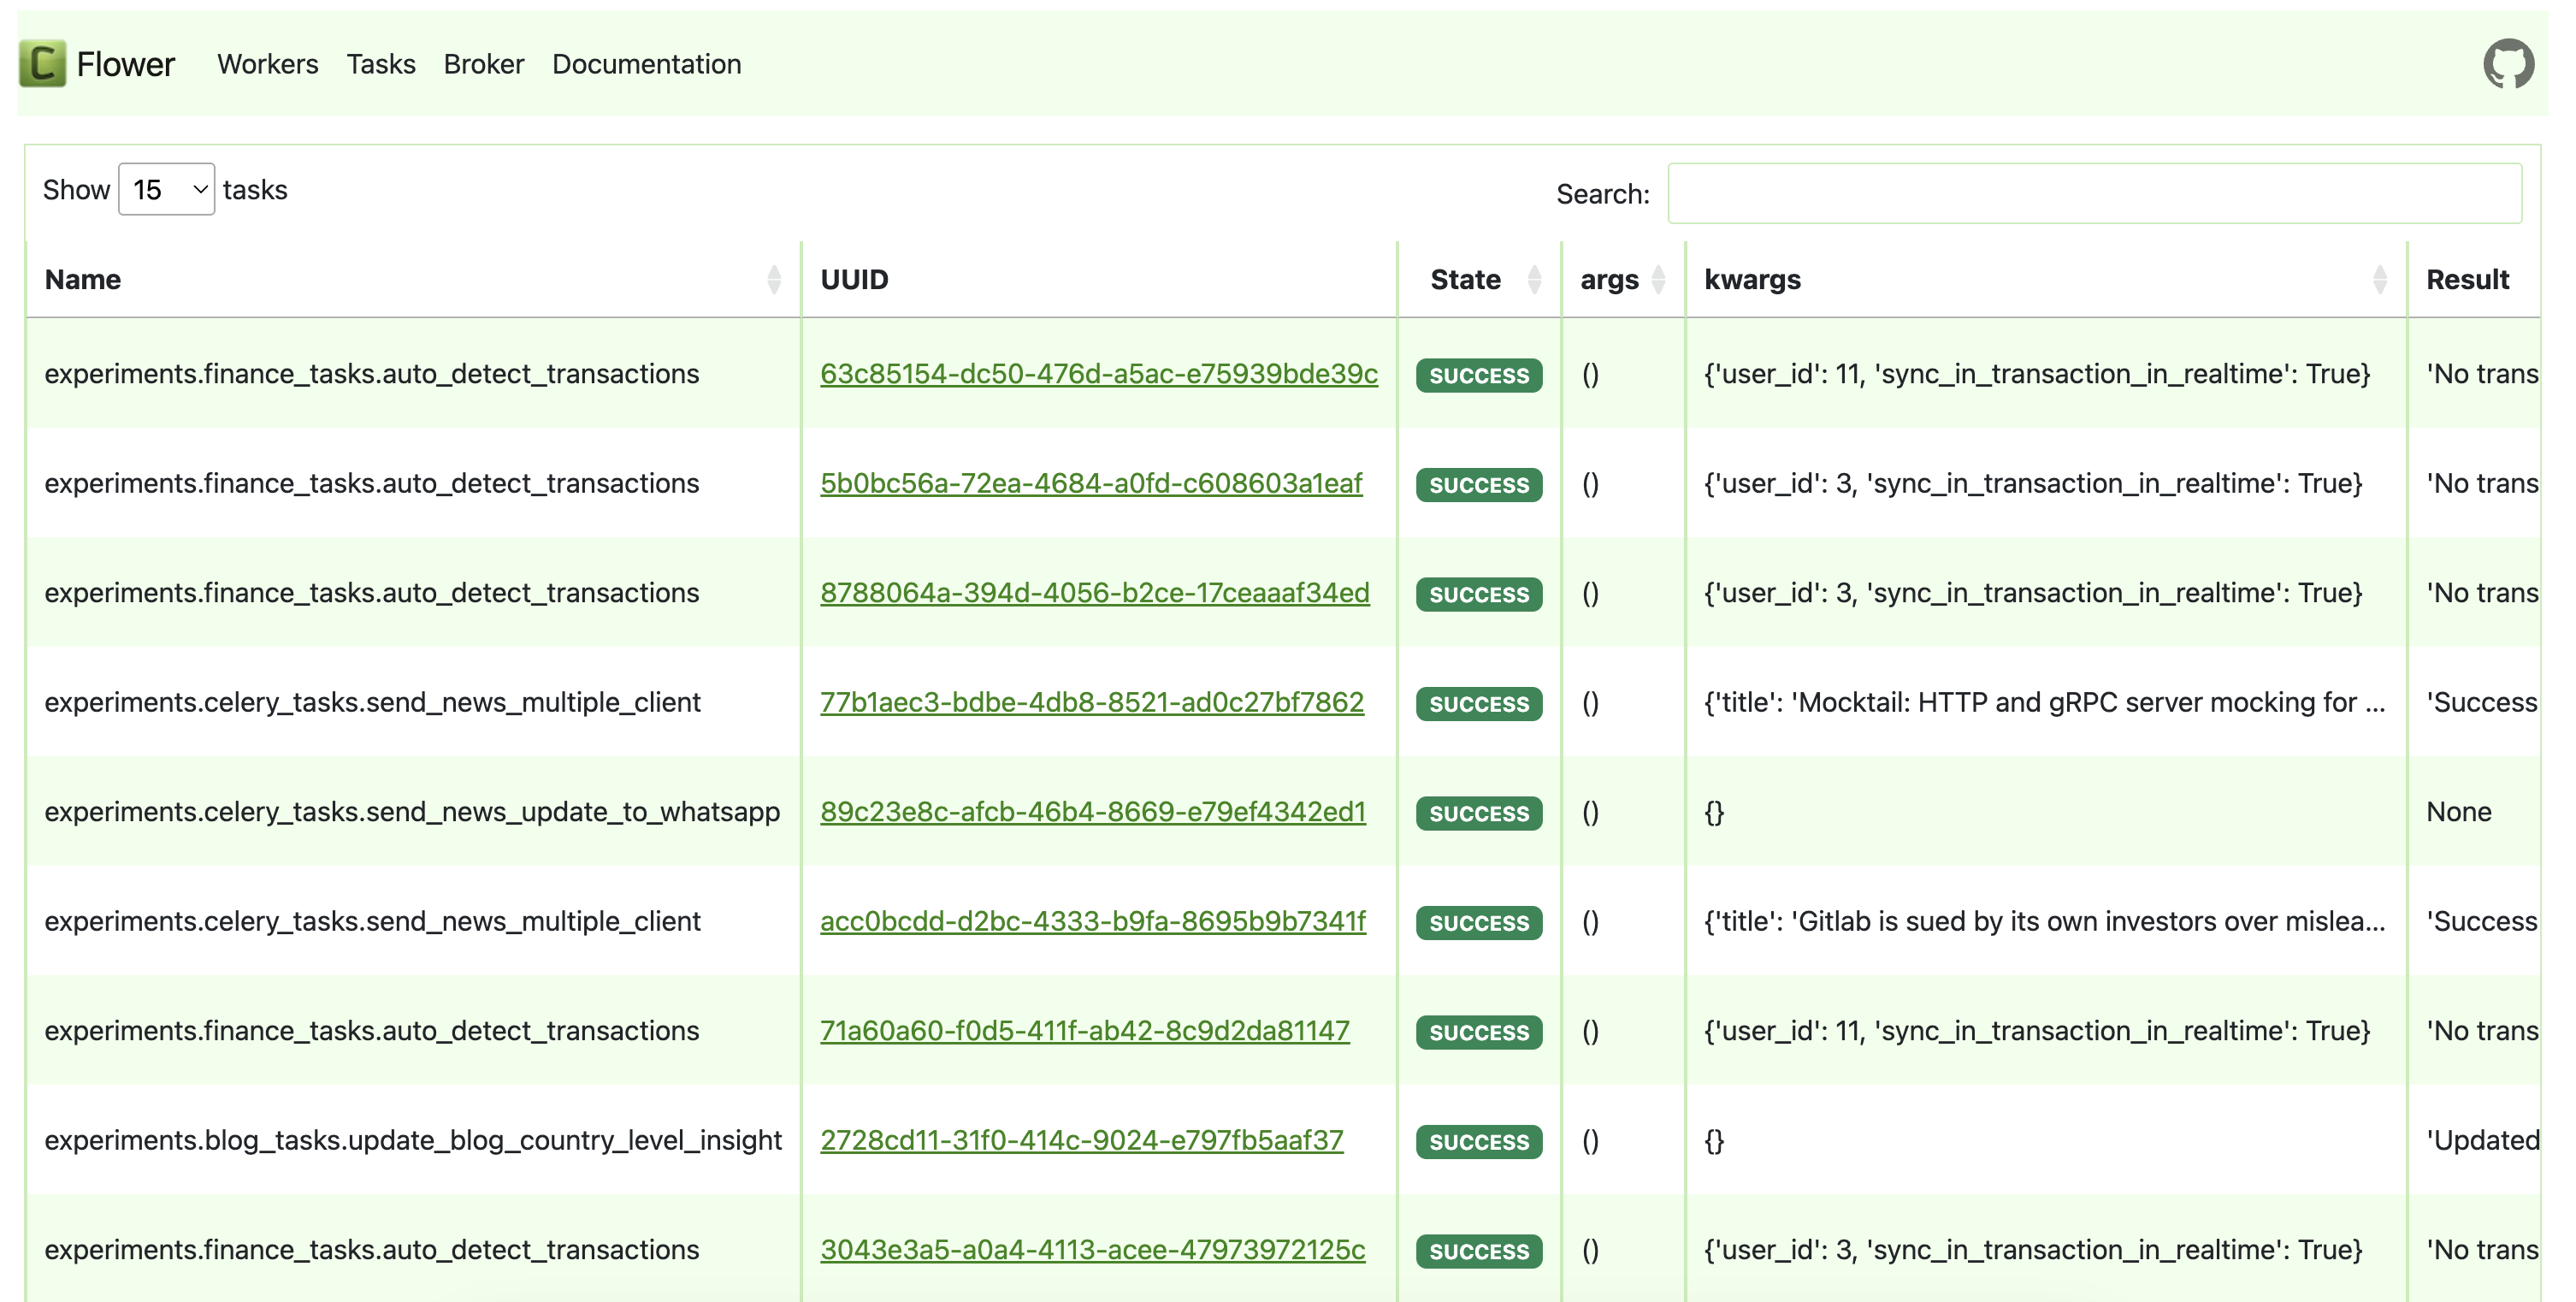
The answer to the above questions is Flower, a web-based monitoring dashboard for Celery. It connects to the same broker our workers use, listens to the events Celery emits as tasks move through their lifecycle, and gives us a live view of every worker, every queue, and every task in the system. Installing and starting it takes two commands:
pip install flower
celery -A tasks flower --port=5555
We simply open http://[HOST_ADDRESS]:5555 and get a dashboard showing each connected worker, the queues it’s consuming from, its current concurrency and load, and a live-updating list of tasks with their state (received, started, succeeded, failed, retried). You can click into any individual task to see its arguments, its runtime, its return value or traceback, and which worker handled it.
Case Study: 3DMotaaS — A Horizontally Scalable Motion Search/Edit/Retargeting Platform
Now let’s look at a real life application of Celery to one of the projects I’ve worked on recently called 3DMotaaS (3D-Motion-as-a-Service), a platform where users can upload, manage, edit motion capture data as well as well as retrieve similar motion sequences given example motion queries.
The 3DMotaaS platform primarily works with .bvh skeletal animation files. One of the main process features of this service is the automatic (and on demand) unification of all motion data by retargeting all motion input in the platform to one fixed universal skeleton format.
All you need to know to grasp the relevance of Celery to this: Many of the processes offered by this platform can be very computationally intensive (because they require on-demand inference of Deep Learning models with motion capture sequence inputs, which can get really large).
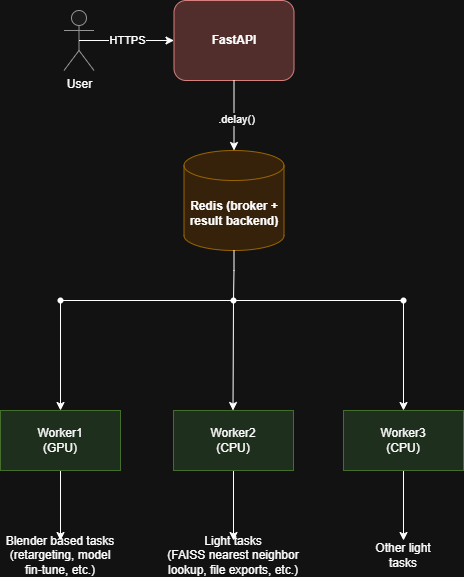
In general, the platform offers features of varying computational costs. These can be retargeting motions onto a universal skeleton, encoding them with a Transformer VAE, searching a FAISS index of pre-encoded motion segments, and returning near-neighbor matches that can be downloaded back in .bvh, .fbx, or .glb form. Behind the API, each one of those steps is a long-running, CPU/GPU-bound, Blender- or PyTorch-heavy job — anything from a few seconds (FAISS lookup) to many minutes (model fine-tuning on a user’s dataset).
It is therefore warranted that we implemented the backend of the service with the capabilities of distributing processes across workers of variable processing capabilities, to ensure a smooth running, optimised and non blokcing service to the users.
We use Celery + Redis in front of a FastAPI front door to turn that pipeline into something that scales horizontally and never blocks a request thread.
Why Celery?
The platform’s following properties make an async task queue like Celery the obvious fit:
- Heterogeneous workloads. As we briefly mentioned earlier, a /retarget job calls into a different conda environment (Blender + a universal-skeleton retargeting pipeline) via subprocess. A /search job loads a PyTorch model and a FAISS index. A /train job runs a fine-tuning loop. We can’t realistically run these inside one single request handler and expect optimal performance.
- Job durations vary. Indexing a single segment (2-3 seconds of motion capture) takes milliseconds, fine-tuning a model takes tens of minutes. Non blocking behaviour is essential.
- Independent jobs, shared infrastructure. Multiple users uploading motion clips at the same time should be distributed across any number of GPUs/CPUs we’ve set up, without manually coordinating this in the application code.
Celery gives solutions to all of the above, almost entirely out of the box: a broker (a Redis instance), a result backend (another Redis instance), and a pool of workers we can scale by simply running more celery worker processes on the same machine or across machines pointed at the same Redis.
Multi-Step Pipelines via Celery Chains
Chaining tasks is also permitted in Celery. For example, in our MotaaS platform, certain processes require the completion of several subtasks to be completed in specific sequences. One of these is our search feature, which receives a motion capture animation as input and returns motions which are similar to the query(we also call this search by example).
For search, we need the user’s motion query to first pass through some pre-processing steps in order to be compatible for input to our motion encoding model. Specifically, the search workflow is a two-stage pipeline: retarget the user’s BVH to the universal skeleton, then encode-and-search. We compose it with celery.chain:
def search(input_path, args):
   workflow = chain(
         retarget_task.s(input_path),
         search_task.s(args),
   )
   return workflow.apply_async()
The output of the first task in the sequence (the retarget_task) is automatically fed into the seconds task (search_task) as its first argument. In this case, task_ids are assigned to all involved subtasks as well as the whole parent task. The client simply polls the parent task in the same way it would poll any other non-chained task. Celery conveniently handles the hand-off, the failure propagation, and the result chaining for us.
Cancellation of tasks
In our platform (and also a requirement in most dynamic apps/services), we need the user to be able to cancel a task, for any reason. Task cancellation is not as straightforward as most of the above, since the running process of a task that was already picked up by a worker might not be accessible at any time. Despite that, Celery does provide some utility in terms of task cancellation by registering a task as an abortable task.
@celery_app.task(bind=True, base=AbortableTask, soft_time_limit=300, time_limit=600)
def process_bvh_task_abortable(self, input_path):
   for i in range(100):
      if not i % 5 and self.is_aborted():
         return {'status': 'aborted', ...}
      process_bvh(str(input_path), str(out_dir))
From client-side, a cancel button is pclick, the FastAPI /cancel/{task_id} endpoint then tries a graceful abort() first. If the task is not abortable, or abort fails for some other reason, we fall back to using revoke(terminate=True). Combined with task_track_started=True, we get clean, four-state lifecycle visibility (PENDING / STARTED / SUCCESS / REVOKED) over Redis.
An abortable task method will simply only keep a task running if the .is_aborted() method is not true (loop logic above). As soon as the user requests cancellation of a task via the UI, .is_aborted() will be True, and the task will be revoked from the task queue.